Simmons Beautyrest Mattress Rebuild

So I finally got around to testing some of the latex I had just to get some baselines. I did both dunlop and talalay so you can see how they respond differently (it’s not just hearsay) based on the pressure being exerted on the foam. I was going to do the my 3" soft (20ILD) dunlop too but it’s in the bed right now and I don’t really have it in me to pull the bed apart just for testing. I will add it to the chart the next time I have the bed apart along with some 3" natural talalay firmnesses as well.

Testing them was a bit more complicated than I thought. I cut out an 8" diameter circle from 3/4" plywood to act as the pad that pushes into the foam (standard requires 50 sq-in). Then I used my gym weights to stack onto the board and measured the deflection of the foam at each weight. I quickly realized you need to use a level on the weights because they will lean slightly one way or another and it messes up the readings you take off the depth of the plywood. I used the edge of a picture frame that was exactly 3/4" thick which gave me a zero depth with no weights on the board at all. I used the depth side on a set of dial calipers to measure the distance from the edge of the picture frame to the top of the board so the distances are pretty accurate (not as good as a testing machine but way cheaper). I can take a photo when I do it again if people are interested to see how I did it.

Here’s the graph I got after the testing was done:

I have to say even though I knew the results should be different for both types of materials I didn’t really have any idea what the graph would look like. I did add an ILD line approximately where the ratings would make the most sense versus their rated firmness but as you can see the they don’t exactly match up to what you’d expect. Once I had the data entered it soon became clear why much of what people had been saying about the different types of latex made alot more sense. One big thing I noticed is that 22ILD talalay is actually firmer than 30ILD dunlop at lower weights but then at around 35% compression it crosses over and dunlop deflects much less as additional weight is added. I remember Phoenix saying that his daughter prefers dunlop while he prefers talalay and of course this now makes perfect sense when you look at the graph. It also makes sense why talalay is great in the upper layers because the deflection curve is steeper which would tend to help adults and areas where pressure points are most likely to occur. Anyway, I’ll be adding more to the graph later (maybe even memory and poly foams) but I thought folks would appreciate seeing real life what it looks like for different types/firmness of latex across a wide range of loading scenarios.

Level also has a zoned support system that could be inspiring to some, but Sleepopolis specifically laments how thin the comfort layer is so there’s a risk of sinking through to the support layer.

The weight distribution is a start, but really isn’t adequate since:

  1. Pressure is weight / area so you need to account for the amount of body contact in each zone
  2. Pressure is not evenly distributed within each zone due to the projection of various parts of the body

Both of these exacerbate pressure points, which have low area and high projection.

At the risk of stating the obvious, the key problem here is that beds are flat and people are not. We try to work around that issue using high elasticity covers and different ILDs of material. Obviously, the second problem is that few people sleep in only one position so we can’t fully optimize the bed for any one position – not to mention the issue of multiple sleepers with different needs.

I still think this is the right way to think about the problem. For the sake of argument, let’s assume we’re optimizing a bed for a side and back sleeper. We want the “profile” of that sleeper under those two conditions (in perfect alignment). This isn’t your profile when you’re standing, but under some reasonable level of pressure since some parts of our body are going to shift in response to the pressure of the bed while others (especially pressure points) are not. It’s even possible that we want less pressure on a pressure point that its “fair share”. The end product is two optimal profiles down the length of the bed in response to two specific pressure curves (higher pressure when side sleeping, lower pressure when back sleeping).

In theory (if not practice), we should be able to match each point down that chart with a material that has the right behavior. Your charts for ILD30 Dunlop and ILD22 Talay demonstrate how this optimization is possible. In some places (like pressure points), you’ll need the deflection to change significantly with added weight (and the Talay does this). The deflection compensates for the projection without adding too much pressure. In other places, you want the deflection to change very little so they bear more of the weight on the higher-pressure side position.

Even if you get this first pass of optimization right, you’ll still have to deal with degradation of materials and changes in the sleeper. The air core is likely a good solution to this problem.

  • You can “always” inflate the air core to the same pressure. I suppose the elasticity of the bladder could change, but I assume “repair” will be a bigger deal than degradation.
  • The air core can be adjusted relatively easily to compensate for change in the sleeper and/or degradation of material. I’m not sure what else could offer this opportunity.

Not suggesting that such a change will be perfect, but it can be no worse than doing nothing (which you have the option of doing) and almost certainly better than a degrading core that must be replaced. It also could help out in instances like pregnancy or injury when sleeping positions must be changed – though it will only be so helpful if the comfort layers are not optimized for that position.

FYI the newest Sleep Number beds (with SleepIQ) have a feature called “responsive air” which adjusts the pressure in response to changes in your position. In theory that addresses a major issue with airbeds and alignment, but has the perverse side effect of making the above optimization harder without careful study of the way it responds.

Clayton, great stuff here! I hadn’t see that mattress before but funny that design is really close to what I was envisioning I would need to do to make the air mattress base layer perform where I need it to (specifically to correct the alignment issue since I can obviously make the base very soft if I need to). Level’s use of soft, med and firm foams was almost exactly the experiment I tried on my floor with foams I had on hand (around 6" total thickness) and I could tell it did wonders for both pressure relief (esp on the shoulder) and alignment of the hips and lower back. The main difference I want to make sure I do with mine would be for me to have the ability to tailor the zones to fit my body proportions better and align them with exactly where I prefer to sleep on the bed.

Here’s the Level Bed mattress design:

.
.

[quote=“clayton” post=87378]
The weight distribution is a start, but really isn’t adequate since:

  1. Pressure is weight / area so you need to account for the amount of body contact in each zone
  2. Pressure is not evenly distributed within each zone due to the projection of various parts of the body

Both of these exacerbate pressure points, which have low area and high projection.

At the risk of stating the obvious, the key problem here is that beds are flat and people are not. We try to work around that issue using high elasticity covers and different ILDs of material. Obviously, the second problem is that few people sleep in only one position so we can’t fully optimize the bed for any one position – not to mention the issue of multiple sleepers with different needs.

I still think this is the right way to think about the problem. For the sake of argument, let’s assume we’re optimizing a bed for a side and back sleeper. We want the “profile” of that sleeper under those two conditions (in perfect alignment). This isn’t your profile when you’re standing, but under some reasonable level of pressure since some parts of our body are going to shift in response to the pressure of the bed while others (especially pressure points) are not. It’s even possible that we want less pressure on a pressure point that its “fair share”. The end product is two optimal profiles down the length of the bed in response to two specific pressure curves (higher pressure when side sleeping, lower pressure when back sleeping).[/quote]

Again you’re right on with what I was thinking about how I would try to solve this. I thought about maybe doing some surface pressure modeling to see if that might help but that seemed overly complex for what I need to do here and I don’t have a complete materials database from which to draw on either. I thought about doing some of it by hand but quickly realized I really wasn’t interested in nasty integrals to figure out the exact surface area. So trying to simplify it as best I can I started thinking I might be able to just approximate the area making contact in each zone by creating rectangular approximations but I’m not sure how close this will approximate real world deflection of the mattress. I think this zoning will actually work pretty well for every sleeping position even stomach because it should support the hips well but we’ll have to see how that pans out. As you alluded to what I want to do is to provide more support to the hips/ribcage which should take pressure off the shoulder area. If you look at the weight distribution on someone my size (250lbs) the shoulder area can push down with over 80lbs of force which is alot on a relatively small area so no wonder people end up with shoulder issues from stiff mattresses. I hope this design will address it well.
.
.

[quote=“clayton” post=87378]
In theory (if not practice), we should be able to match each point down that chart with a material that has the right behavior. Your charts for ILD30 Dunlop and ILD22 Talay demonstrate how this optimization is possible. In some places (like pressure points), you’ll need the deflection to change significantly with added weight (and the Talay does this). The deflection compensates for the projection without adding too much pressure. In other places, you want the deflection to change very little so they bear more of the weight on the higher-pressure side position.[/quote]

You nailed exactly what my goal was with the materials charts and how I wanted to try and solve this issue. The problem I’m running into now is whether I have enough adjustability if I use a single 3" layer of foam to tailor the stiffness (like what Flobeds use on theirs) or if I need to move to using two 2" layers (so 4" total) to give myself more room and granularity to make the adjustments needed to bring my hips and center section into alignment. Unlike the Level mattress I don’t really want to cut and glue the top foam together so I’d prefer design-wise to keep the top layer in a single piece (primarily just pressure relief). In the zoned layer(s) I’m planning on trying both dunlop and talalay since they have different response characteristics depending on how much deflection I need to keep alignment correct.

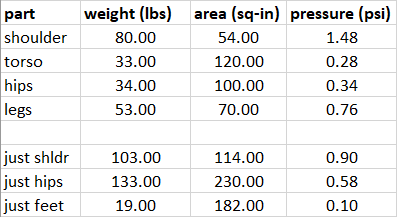
This should be the approximate dimensions and weights in each zone on the mattress:

So my question is whether you think I’ll have enough depth to tune for alignment with a single 3" layer or do you think I’ll likely need 4" (two 2" layers) in order to achieve what I’m looking for? My plan was to use a 3" comfort layer of soft talalay on top of that to provide good pressure relief.

If I look at my side, my hip and shoulder stick out more than 3" past my torso. If I wanted an even distribution of weight with just 3" of displacement, 3" of material will definitely be inadequate. The difference between 44 dunlop and 22 talay at the same weight is no more than 60%-30% or 30%. If we don’t adjust for surface area that would mean that 30% compression = 3" of displacement which requires 10" of material. Some of that shaping may come from the air layer, but I assume it’s not so elastic to make a big difference between hip and torso (vs say head, hip, and foot where I’d expect it to compensate for a lot of displacement).

Clayton, great comments again, really appreciate it. It got me thinking about how to best use the materials chart and I quickly realized that after looking at your example using forces on there doesn’t really work well (because the testing area was a static 50 sq-in). I realized the only way it really works (as you pointed out above) was to account for the area of each body part as well as its weight. So as you mentioned Pressure = Force / Area and using both would allow you to normalize the area of a body part and convert it to something useable on the chart. This way you can calculate the approximate pressure each body part would likely apply and then it will show you the deflection for any given material at that pressure (which then translates into body alignment too). It’s very likely not perfect but it should at least get me in the ballpark for the thicknesses and firmnesses of each layer as well as the number of layers I might need to make this all work. I also took the time to open up my bed and test the soft (20ILD) dunlop latex and add it to the chart as well. I decided to make all the dunlop warmer colors (yellow, orange. red, etc) and the talalay data will be cooler colors (green, blue, purple, etc) so it makes it easier to see each at a glance.

So here’s the updated chart:

You can see very clearly from the chart that dunlop has less travel than talalay as pressures increase (up to 0.4 psi dunlop would actually feel softer than talalay). You can also see that the softer (20ILD) dunlop begins to taper severely at the upper end of the pressure range (ie material begins to bottom out) whereas the soft talalay was still able to deform further. So I tried to calculate how much pressure each body section should see and it begins to make alot more sense when you apply it to the chart.

I tried to calculate this 2 ways to double check the results. First, I used the weight distribution graph to calculate each section weight and then second, I actually just lied down on a scale and tried to see how much weight was actually on my shoulder, hips and feet. The weights on the scale do add up to more than my total body weight (about 245lbs) vs 255lbs adding the scale weights but it shouldn’t affect the results too much in that respect. The results also did overlap well with the distribution percentage chart so I’m pretty satisfied that it’s going to be pretty accurate using the bodyweight distribution if others wanted to do the same thing later. As for areas I had to use my own calculations to approximate the surface area for each section in the first section. When calculating the body areas for the second method I grouped the areas for the shoulder and 1/2 the torso, then 1/2 the torso, the hips and the thighs and finally just the bottom of the legs. So after doing all that I have to say I was really surprised by how much pressure your shoulders actually generate relative to the rest of your body. it also explains why if you have broad shoulders you’d need to have that area be soft in that area while supporting your torso better to reduces the pressure up by your shoulder.

My next post I’m going to take a stab at calculating the firmnesses and thicknesses of the layers based on the table/chart. I’ll be taking the measurements I provided above to ensure each section of the body is in alignment based on the total deflection in each section. In short you can draw a straight vertical line across the graph for each pressure you encounter and it should show you the deflection each material will see for that pressure (thanks again Clayton for the idea). I will need to guess at some of it because I don’t have a complete database for talalay at all yet so we’ll have to see how close I get once I start to actually build it. Anyway happy to hear any suggestions / comments folks might have as well.

This is great/exciting work. I actually wrote off Latex after trying it in-store because the deflection on my pressure points wasn’t relieving enough – a sentiment that I’ve seen from a bunch of people in similar contexts. If I were willing/able to combine different materials as you’re doing, I could imagine getting the best of several worlds e.g. pressure relief, cooling properties, natural product, and durability.

I also found/consult with startups so your progress has me thinking about business models. Even if you gave away the “bed optimizer” results for free, I assume cutting latex would void return policies virtually anywhere. That creates a pretty high hurdle to its use under the best of conditions – let alone creating an opportunity to repay you for your cost/effort to deliver it.

vZone improves the return scenario by fixing zone sizes, but I’m not impressed by their zoning. I think the region for hip and shoulder pressure points should be relatively small with more support across the rest of that part of the body. The problem with a smaller hip/shoulder zone is that it would need to be customized to things like sleeper height and preferred location on the bed. You’d also need to be able to configure the bed sides differently. You’d have more data so you might be able to pull this off.

It seems like you’d need to be collaborating with a Latex (bed) manufacturer. The manufacturer could cut and assembly it for the customer, increasing the accessibility to non-DIY and making returns/exchanges possible – for zones or whole beds. Once you have working models, the beds should command a premium price and experience much lower rates of return. Together this should increase the profit margin compared to regular latex beds (less the added cost of cut/assembly) so there should be room to reimburse you for the modeling.

P.S. I’m not sure how you got the shoulder math, but it seems extreme to me. A lot of that “thorax” weight is the arms. One of my arms is against the bed so it’s contributing to surface area and putting relatively little weight on the shoulder. I actually “hug” a pillow so a lot of the weight of that upper arm is transferred through that pillow to the lower arm or bed (either less weight or more effective surface area). That’s probably a question you’d need to ask to accurately estimate weight distribution for an arbitrary person.

I figured I would update this thread since I finally got my foam saw but Covid has made it really hard (and more expensive) to source all the latex layers so still working on that for now. I will also be adding in some HD polyfoam and 5lb memory foam to test as well just to see if it provides any usable benefit in the build. I’m going with all 2" foam layers for now so I can have 3 different layers (6" total, sits over the air chambers) on each side to make changes to. I may be able to substitute one of the 2" foam layers in the stack for 3" later (ie 2/2/3 vs 2/2/2) but I’m pretty much at the limit of the Purple mattress cover right now. I’ll run some testing on the foam when it arrives and then add it to the charts so people can see how it all compares.

I figured I would update this thread since it’s been a while and Covid has been very frustrating to source materials for DIY bed building. I had been using the same configuration in my last post up until around 2 months ago when I started to have pain in my hip/lower back again. So as a result I had to switch to our guest bed (Sealy from Costco) until I could come up with a fix. At this point I decided to deviate a bit from what I was originally wanting to do in an effort to speed up the process to get something that works for me. So I decided to order some components from Flobed (pair of V-zones for each side and a convoluted 2" topper). I was very excited to try these out and see if it would correct the alignment issue for my hip/back. The good news is that adding the V-zone and convoluted layers along with another 2" layer of talalay did help tremendously with my alignment issue. We had to swap around some of the zones but finally got something that seemed to fix the alignment problems. The bad news is that the Purple mattress cover I had now began to limit the pressure relief for both my wife and I because it was being stretched too tight. So I have now decided to also get the V-zone mattress cover from Flobeds to see if that fixes this problem. I really like the Flobed V-zone setup and it will be nice to have a zippered top on the mattress because the Purple cover is great but since the zipper is on the bottom it’s a pain to get installed.

So just to summarize this is what I have right now and working on getting a new mattress cover to make it all work.

2" - 14ILD - talalay eggcrate from Flobeds
3" - variable (Firm/Soft) - V-zone from Flobeds
2" - 36ILD/28ILD - talalay from APM
6" - Air bed - base from a Sleep Number bed

Still working to adjust my shoulder area for more travel but hips/back are dramatically better now with this setup.

Had a bit of a breakthrough with the design today. Last night my alignment felt good but I had some pressure soreness on my hip when I woke up. Since I’m at around 250Lbs (right on the edge of where Flobeds seems to recommend their Big & Tall 16" mattress versus their standard V-zone 12" mattress) I thought I should look at the differences between the two designs. So looking at them both you can see that the Big & Tall design adds an additional soft comfort layer over the V-zone layer and under the egg crate foam layer. I was initially thinking this would likely solve my pressure issue but I was unsure how it would affect my wife’s side since she’s only half my weight. After talking to her I found out she actually wanted to be able to sink into the bed more too so it sounded like this might work well as a design change for both of us. I happened to have a king size 2" talalay 22ILD layer lying around so I decided to try it and see how we liked it. Turns out it was just what we needed to make the design really work for both and looking forward to getting the new mattress cover on too. Mattress is definitely taller now (12" vs 15") but the difference is incredible. One thing I did notice is that the additional comfort layer does slightly change the feel of the V-zone layer below so I may need to do some slight tweaks on that but overall super pleased with how it all feels now. One thing to note is the egg crate layer from Flowbeds is actually cut not molded so due to the manufacturing process it constantly sheds tons of little latex boogers all over the place and static makes them stick to everything (like styrofoam). It’s a pain when you’re testing layers (gets everywhere) but once the mattress is all together it’s not really a big deal at all.

Current setup:
2" - 14ILD - talalay eggcrate from Flobeds
2" - 22ILD - talalay topper (had already)
3" - variable (Firm/Soft) - V-zone from Flobeds
2" - 36ILD/28ILD - talalay from APM
6" - Air bed - base from a Sleep Number bed

Made a few more adjustments to the V-zone layer to get it dialed in for us and man, what a difference that made! My wife has been commenting every morning that she feels like she’s stayed at a luxury hotel and doesn’t want to get out of bed early (she’s normally a super early riser so not like her at all). I made some adjustments in the shoulder area for both of us and it hasn’t felt that good for me in quite a few years. I woke up with zero shoulder pain at all and I felt so good I was actually able to bench and work out my shoulders finally, that’s huge progress. My hip still has a bit of pain so I know the alignment still isn’t optimal in that area yet but the V-zone adjustment layer is a godsend to be able to make those adjustments as needed. I have a few configurations I wanted to try to fix my hip issue but I needed to get more parts from Flobeds to make it work. I called them up to order the the extra pieces (fully expecting to buy them) and was very pleasantly surprised to find out that if you buy the V-zone layer at full price you also get their guarantee of sending whatever parts you need to make any adjustments free of charge. This is just amazing customer service, can’t say enough about these guys. Had I known this up front I don’t think I would have ever contemplated doing anything else. Obviously buying alot of different full 3" talalay layers in various firmnesses is both costly and time consuming to get cut/fitted. So if you have a complex alignment situation, unless you know exactly what firmnesses will work for you (and you don’t need too many) the V-zone setup is probably the most cost efficient option for most people with complex zoning issues (like myself).

Here’s what I have in the V-zones for each side currently:

I still had some pain in my hip obviously from misalignment so even though I don’t have the new pieces I need from Flobeds I figured I would try to experiment with what I had to see what might help improve the situation. One thing I noticed was than the hips foam area was large and the torso area was quite small relative to my size. I think this was still allowing my waist to bend down into the bed and putting pressure on my hip as I sleep 90% on my side (maybe 10% on my back). So I figured if I could extend the torso support it would help take pressure off my hip. So as you can see I swapped around the foams to get a larger one in the torso area (this doesn’t fit in the zippered cover Flobeds gives you so they just sit loose in there).

So I slept on this last night in my normal position and I felt better supported but I had alot of pressure on my hip still. Then about halfway through the night I realized I was not tall enough for my shoulder to be in the soft section and have my hip in the firm area so I just slid down in the bed to where it felt good on the hip (I didn’t care about shoulders at that point since I wanted to get this solved). I slept the rest of the night like that and it was alot better. So I suspect I may need to custom cut 2 large foam pieces to where I need the transition to be (likely right around the waist area). I also realized that having soft areas down at the legs will help the angle on my hip too but not much I can do there until I get the pieces from Flobeds. I need to sleep on this configuration a bit more to get a real feel for how well it will work but I’m happy with the progress anyway. My wife still loves her side so no changes on that at all.

Wow! What a journey. You have done an enormous amount of research.

Did you get a Flobeds cover? Maybe I missed that post. I’m curious to know how it worked :slight_smile:

Thanks for sharing so much info!

Thanks to ongoing covid nonsense from the Feds in Canada both the Flobeds cover and the additional pieces to fix the zoning on my side are still sitting at the border. I should have them soon and I’ll definitely update the thread when I get it all installed.

What a bummer! Hopefully it will arrive soon.
I look forward to hearing your full report.

Wow mattrebuild! I just read through this thread in its entirety for the first time and it makes my mattress journey look simply by comparison. Some great info here.

Finally got the new mattress cover from Flobeds and it blows away what I had before from Purple. While assembling the mattress I was a bit concerned that maybe I didn’t calculate the layer height correctly but once it was all zipped up it fit perfectly and the feeling was amazing. I was also worried that it might change the feel of the layers below but if anything it feels better not worse. Now it really looks as good as it feels. I was thinking it might be a bit overpriced too but when you see it in person you’ll know why it costs as much as it does, this thing just oozes quality. Cover is made of a stretchy cotton and wool so it doesn’t feel too hot even when you sink right into the bed. Very impressed so far. I also got the extra V-zone talalay pieces I needed to hopefully tweak my side to get my alignment where I want it. I’ll post an update for that once I get it nailed down. The new cover certainly makes changing zones a breeze since the zipper is now on the top instead of the bottom. Overall super impressed with how it’s all coming together.

Not totally mattress related but perhaps helpful for others in a similar situation. In an effort to deal with my bad hip/lower back (from my prior bad mattress) I decided to treat myself to a Theragun Pro G4 massage gun. This is their top of the line offering (ie what the pro sports teams use). I’ve had that bed injury nagging me constantly for quite a while but after just 1/2 hour of using the gun it was just incredible how all the tension and pain melted away. These are not cheap items at all (retails for $600 but you can get brand new ones on ebay for around $400) but when consider what a massage therapist costs, I can easily justify it. It literally feels like you just got a really deep massage when you’re done. Also has an app on your phone that works via bluetooth to guide you on what to do but haven’t played much with it honestly. Anyway this thing was worth every penny if you have the budget for it.

Well, I have some good news and some bad news to report. Bad news is that the new mattress cover seems to have made the mattress stiffer for some reason (not exactly what we wanted). My wife complained about her shoulder being sore (night before she slept great) and I noticed pressure points that I didn’t have a problem with prior either as well as some hip rotation (lack of travel in rear when back sleeping). It’s obviously at least partly a tension problem but I need to have another look to see if there’s some combination of the sheets being tighter (total height with the cover is about 1" taller) or if the mattress cover being thicker is an issue or if the cover being too tight may be causing this issue. If it turns out that the mattress cover itself is causing the issue I have a few ways to fix it (possibly modifying the top of Purple mattress cover to zip onto the Flobeds mattress cover bottom). For now we’ll just pull the mattress cover off and replace it with the mattress pad that did work until I can figure out a solution.
The really good news though was that I used the new massage gun and in a few minutes it had me pain free up and running around this morning way better than I ever have before. Anyway I like to report both the good and the bad but it looks like I have a bit more engineering to go before I can call this one done.